
A couple months ago, a customer of mine was kind enough to donate some decommissioned Cisco Catalyst 3750G's to me. I was happy to accept them as my test lab was growing in size and I had the need for multiple network segments. With the switches capable of doing Etherchannel, VLAN Trunking & Stacking I finally had a large-scale network infrastructure which in all honesty is probably overkill for my needs, but was fun to setup nonetheless. The one thing I hadn't expected was the large-scale power bill that came with running these switches. In fairness, these switches are meant for an enterprise environment and not for the average home user, but even running these switches for half a day caused a significant increase to my power bill and I grew tired of constantly remembering to turn the switches on and off. I decided it was time to find a more power-efficient switch that I could leave on all day and uplink to my 3750G's only when needed.
After much online shopping and research, I settled on the TP-Link Easy Smart 16-Port Gigabit Switch. Even though it didn't have the 10G ports I would've liked for future expansion, at $84.99, I couldn't pass it up.
TP-Link's Easy Smart line of switches provides some key features that are usually reserved for more expensive switches like QoS, Port Mirroring and most importantly VLAN & Port Trunking. The caveat being it doesn't support LACP (802.3ad), but it does support Static LAG's (Link Aggregate Groups). The switch also lacks a command-line interface and you are forced to configure it via it's Windows-only config utility or a Web-GUI which the first revision lacked. As far as I can tell, there's really no difference between the two so you're better offer sticking to the Web-GUI.
Synopsis
The Setup
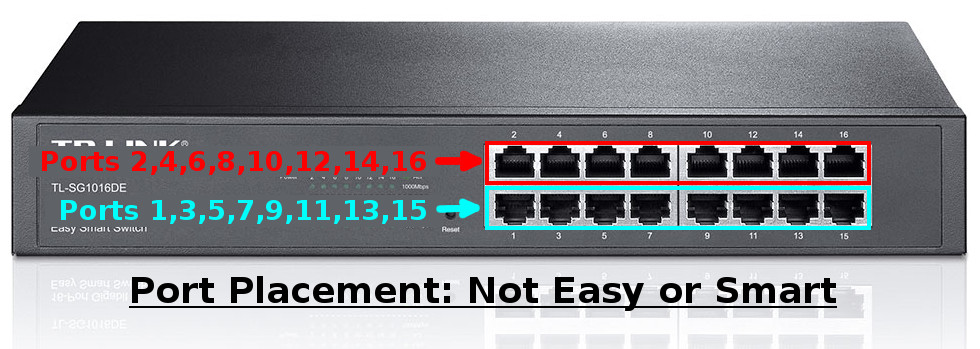
The initial setup is pretty standard so if you've ever had to setup a wireless router you should have no trouble getting this switch up and running. The one thing you do need to remember whenever configuring this switch is to save your changes. The switch has a running config and a saved config. Any changes you make will automatically take effect, but will be lost at the next reboot unless you click on "Save Config" in the main menu. This is a concept that enterprise switches use in case you ever screw things up so badly the only way back is do the good ole reboot. The other weird thing about this switch is the ports are upside-down. All the odd numbered ports, e.g. 1,3,5.. are on the bottom and all the even numbered ports are on top. I have never seen a switch configured this way and it's something you need to be mindful of.
VLAN: The Practical VR
The VLAN settings which look straightfoward are actually a bit awkward and can lead to a little confusion. In my case I wanted to pass multiple VLAN's through a single port as well as through a LAG so I needed to head over to the 802.1Q VLAN settings. TP-Link assigns every port to VLAN 1 by default and this cannot be changed. You can however create new VLAN's and assign any port/LAG to pass the VLAN as tagged or untagged traffic.
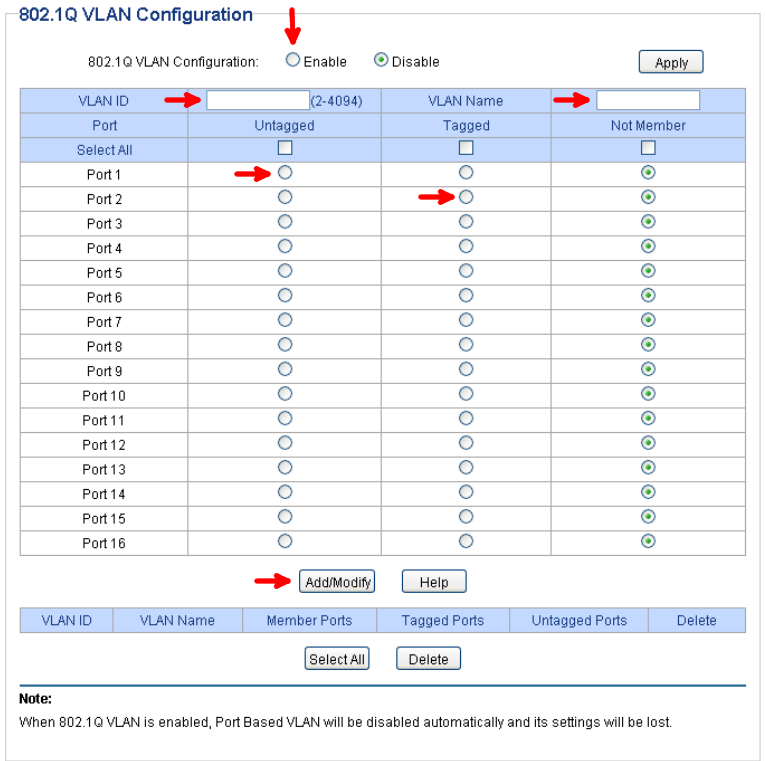
You first need to enable the 802.1Q VLAN configuration, enter a VLAN from 2-4094, enter a name for the VLAN, then select which ports/LAG's you want to have pass either tagged or untagged traffic. After hitting the Add/Modify button you should be all set, right? Wrong!
After assigning your VLAN's to their selective ports, you need to setup the default untagged VLAN for each port. This is something that has already bit me twice as the default VLAN is set to 1. You would think selecting an untagged VLAN for a port in the 802.1Q VLAN settings would automatically change this for you, but sadly it doesn't and we need to head over to the 802.1Q PVID settings page.
Enter a VLAN you want to function as the default for untagged traffic, select the ports you would like to set this on and click Apply. You should now have your ports setup to handle VLAN's. Not too difficult, but TP-Link could've made this process a whole lot easier. Don't forget to hit the Save Config link once you've tested everything out.
Creating a Port Trunk i.e. Forming Voltron
My goal from the very beginning was to create a port trunk or LAG on my TP-Link and connect it to my Cisco 3750G's. A LAG is when you combine multiple physical ports and have them act as a single logical port which gives you the added benefit of redundancy, load balancing and greater overall throughput. This is made a lot more difficult because as stated earlier, TP-Link Easy Smart switches don't support LACP. LACP is a protocol that allows switches to automatically detect LAG's on another switch and magically configure its settings to match each other. Without LACP, you need to manually configure both sides and make sure you don't accidentally create a bridging loop that brings down your entire network. No pressure.
Setting up the TP-Link is quite easy. Just select a Trunk Group from 1-8, then click on up to 4 ports you'd like to add to the trunk. Click Apply and you're done. Now comes the hard part. Dumbing down the "Smarter" switch so it can talk to the budget switch.
Cisco LAG(not the slow kind)
The hardest part about finding instructions on setting up a LAG, is all the different names it's known by. You'll see terms like Port-Channel, Etherchannel, LACP and PAgP which are all very similar and are often mistaken for each other or sometimes encompass one another. The other difficulty stems from the fact that Cisco's IOS, their operating system, has changed greatly over the years and also varies from device to device. We're going to focus on creating a Static LAG which Cisco identifies as a port-channel. Keep in mind that this guide may not specifically apply to your situation unless you're running the exact same hardware on the exact same software revisions that I am. At the very least, you'll be able to see what is possible and you'll walk away with a much better understanding of what needs done to get your switches connected.
With that out of the way, you'll need to access your Cisco switch via console or SSH and enter your enable password. Once in, we'll need to create a Port-Channel.
conf t
interface range gigabitEthernet 1/0/1-2
channel-group 1 mode on
These commands add ports 1 & 2 on our switch to a new trunk group called Port-Channel 1. Now that our ports are in a Port-Channel group, any changes we make to the Port-Channel will automatically be passed to its member ports. Next we'll configure the Port-Channel and its VLAN's.
conf t
interface port-channel 1
switchport trunk encapsulation dot1q
switchport mode trunk
switchport trunk native vlan 1
switchport trunk allowed vlan 1,50,100
We now have the mode and encapsulation setup on our Port-Channel as well as its native and allowed VLAN's. The native VLAN on a Cisco switch is the VLAN that passes untagged traffic. On our TP-Link switch this is controlled by the 802.1Q PVID setting. We want to make sure the native VLAN of our Port-Channel matches the 802.1Q PVID setting of our LAG on the TP-Link which in this scenario is VLAN 1. I'm also allowing VLAN's 50 & 100 which will traverse our LAG as tagged traffic. Just make sure your TP-Link is set to pass VLAN's 50 & 100 as tagged traffic over the LAG as well.
At this point we should have a working LAG between our TP-Link and Cisco switches, but by the time you read this you may be hit by an error which has popped up on the Cisco console which has just destroyed your working LAG.
Cutting Down the Spanning Tree
Cisco switches have some safety checks that are turned on by default. One of the them checks to see if Spanning Tree is setup properly on both ends of a LAG. Since the TP-Link is a budget switch, it doesn't support Spanning Tree. It does have loopback prevention that is disabled by default, but I'm not quite sure what kind of standards it adheres to. The Cisco switch can't detect spanning tree on the TP-Link so it automatically shuts down the LAG. We need to disable this check so our LAG can go on its merry way.
conf t
no spanning-tree etherchannel guard misconfig
interface port-channel 1
no shutdown
The Spanning Tree check is now disabled and we have brought our Port-Channel back online.
Balancing the Load
This last step is an optional one, but it does control how the LAG balances traffic over its member ports. There are a bunch of different options, but I usually go with load balancing based on the source and destination IP address.
conf t
port-channel load-balance src-dst-ip
Save Your Work
Once you've done all your testing and you're happy and proud of all you accomplished, don't forget to save your changes.
write mem
That's all for this post. It wasn't as detailed as some of my others, but hopefully this allows you to save a little money when designing your next network.
 :
: