
I've spent a bit of time researching this topic as I was trying to find a low-cost solution for clients who needed their websites to be up 24/7, but don't have the budget for an enterprise type setup. Initially, I tried out a two server solution utilizing MariaDB's MaxScale software, but soon found out that this software requires a paid license and that only older versions are free to use.
This caused me to pivot to a three server solution utilizing a Galera Database Cluster, HAProxy & Keepalived. While a three server setup is not normally considered "budget", in a load balancing scenario with all of the software components being FREE, I'd say that's a bargain.
As usual, I'll be using the latest LTS version of Ubuntu (20.04) and the stable version of MariaDB (10.5).
Synopsis
Intro
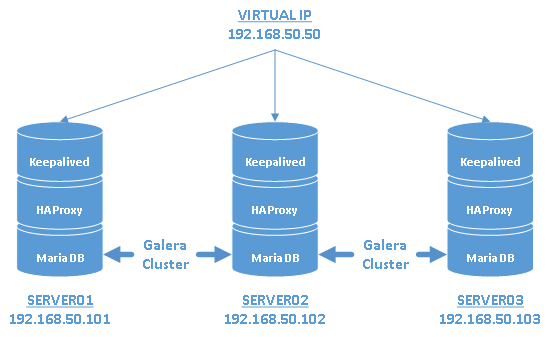
All three servers will be setup pretty much identically which means in a worst case scenario, a single server can still keep your database infrastructure running. However, it's still strongly advisable that you never have more than one server down at any time due to the way Galera handles outages and syncing.
The diagram above lays out how we'll be setting up this environment with three servers:
Servers
server01 - 192.168.50.101
server02 - 192.168.50.102
server03 - 192.168.50.103
A Virtual IP (192.168.50.50) will be fronting all three servers and be used for any connections to the MariaDB Galera cluster.
The following packages should be installed before starting: rsync which is used by Galera to sync database changes and net-tools which can help you check and troubleshoot any network issues.
sudo apt install rsync net-tools
*NOTE: Rsync should be installed by default with Ubuntu Server, but it doesn't hurt to confirm.
Installing MariaDB
First up, you'll want to install MariaDB on all three servers by doing the following.
sudo apt-key adv --fetch-keys 'https://mariadb.org/mariadb_release_signing_key.asc'
sudo sh -c "echo 'deb [arch=amd64] http://sfo1.mirrors.digitalocean.com/mariadb/repo/10.5/ubuntu focal main' > /etc/apt/sources.list.d/mariadb.list"
sudo apt update
sudo apt install mariadb-server
*NOTE: You can select a different repository mirror by going to https://downloads.mariadb.org/mariadb/repositories/
Setting Up the Galera Cluster
For those new to Galera, in short, it's a way to setup multiple MariaDB instances as synchronized masters so that anytime one instance is written to, all other instances automatically write those changes as well. In the event of servers dropping in and out of a cluster, Galera determines the most up-to-date servers based on a majority which is why only an odd number of servers are allowed in a Galera cluster. This is also why we need a mininum of three servers for this particular build.
First we'll need to bind MariaDB to each server's individual IP address and set a unique server-id for each instance. We'll accomplish this by editing the default MariaDB server config file on each server.
*NOTE: It's important that MariaDB only be bound to the IP address of the server and not 0.0.0.0, because this will cause issues with the HAProxy and the Virtual IP which we'll be setting up later on.
sudo nano /etc/mysql/mariadb.conf.d/50-server.cnf
On each server, uncomment and change the following settings within each config file.
bind-address	= <server IP address>
server-id	   = <unique number>
Replace <server IP address> with the IP address of each server, i.e. 192.168.50.101 on server01, 192.168.50.102 on server02, etc.
The server-id is just a number used to identify the MariaDB instance during monitoring and testing of the cluster. Replace <unique number> with any number not used by any other server, i.e. 1 on server01, 2 on server02, etc.
Next we'll create the config for the Galera cluster on each MariaDB server.
sudo nano /etc/mysql/conf.d/galera.cnf
Adjust the following settings for each server, copy into each galera.cnf file and save.
[mysqld]
binlog_format=ROW
default-storage-engine=innodb
innodb_autoinc_lock_mode=2

# Galera Provider Configuration
wsrep_on=ON
wsrep_provider=/usr/lib/galera/libgalera_smm.so

# Galera Cluster Configuration
wsrep_cluster_name="mdbcluster"
wsrep_cluster_address="gcomm://192.168.50.101,192.168.50.102,192.168.50.103"

# Galera Synchronization Configuration
wsrep_sst_method=rsync

# Galera Node Configuration
wsrep_node_address="192.168.50.101"
wsrep_node_name="server01"
The above settings can be used on server01. You'll need to change the wsrep_node_address and the wsrep_node_name on the other two server's configs to match their respective IP addresses and names.
After setting up the configs on all three servers, we're now going to start the Galera cluster on server01.
sudo galera_new_cluster
Now restart MariaDB on the other two servers to have them join the cluster.
sudo systemctl restart mariadb
To check that all three servers are now joined to the cluster, run the following command on any server.
sudo mysql -u root -e "SHOW GLOBAL STATUS LIKE 'wsrep_cluster_size'"
The output of this command should show the value of wsrep_cluster_size as 3.
Setting Up HAProxy
HAProxy will accept incoming connections on the virtual IP which we'll be setting up in the next section. It then load balances that traffic across all three MariaDB instances.
Run the following on all three servers to enable them to bind HAProxy to the virtual IP.
sudo bash -c "echo net.ipv4.ip_nonlocal_bind=1 >> /etc/sysctl.conf"
sudo sysctl -p
Install HAProxy on each server by doing the following.
sudo apt install haproxy
Now edit the HAProxy config, haproxy.cfg, on each server.
sudo nano /etc/haproxy/haproxy.cfg
Add the following to the bottom of each config file. These settings will be the same on all three servers.
# Galera Cluster Frontend config
frontend galera_cluster_frontend
	mode tcp
	bind 192.168.50.50:3306
	option tcplog
	default_backend galera_cluster_backend

# Galera Cluster Backend config
backend galera_cluster_backend
	mode tcp
	option tcpka
	balance leastconn
	option mysql-check user clustercheck
	server server01 192.168.50.101:3306 check inter 2s downinter 5s rise 3 fall 2
	server server02 192.168.50.102:3306 check inter 2s downinter 5s rise 3 fall 2
	server server03 192.168.50.103:3306 check inter 2s downinter 5s rise 3 fall 2

# HAProxy WebGUI
listen stats # Define a listen section called "stats"
	bind :9000 # Listen on localhost:9000
	mode http
	stats enable  # Enable stats page
	stats hide-version  # Hide HAProxy version
	stats realm Haproxy\ Statistics  # Title text for popup window
	stats uri /stats  # Stats URI
	stats auth haproxy:hapassword  # Authentication credentials
There are a lot of settings being added, but in short, we're telling HAProxy to listen for any MariaDB connections on the virtual IP we'll be creating with Keepalived and forward them to one of our three MariaDB instances based on whichever instance has the least amount of connections. We'll also be using a more advanced check of our MariaDB instances to not only ensure they are running, but also to check that they are not hung and can accept login attempts.
The bottom section of the config enables a WebGUI page that will allow you to monitor HAProxy it's connections to the cluster. You can connect to it through any browser at http://192.168.50.50:9000/stats.
*TIP: There are a ton of different options that can be tweaked and added within HAProxy. If you'd like to explore more features, the HAProxy Manual is a good place to start.
With the explanation out of the way, we'll now create the three MariaDB accounts which HAProxy will use on each server to check if MariaDB is running and responding. These accounts won't be given any privileges within the cluster, but by default they can see the information_schema database. If this is too much of a security risk for you, you can remove the option mysql-check user clustercheck setting and skip the next step. HAProxy will instead do a basic check to verify MariaDB is running.
sudo mysql -u root -e "CREATE USER clustercheck@'192.168.50.101';CREATE USER clustercheck@'192.168.50.102';CREATE USER clustercheck@'192.168.50.101';flush privileges;"
Restart the HAProxy service on each server.
sudo systemctl restart haproxy
Setting Up Keepalived
We'll now create the virtual IP with Keepalived which will front our cluster and handle failover in the event of an outage. The virtual IP will reside on server01 and in the event of an outage, failover to subsequent servers based on a priority setup within each Keepalived config.
First install Keepalived on each server by running the following command.
sudo apt install keepalived
Now create the Keepalived config file on each server.
sudo nano /etc/keepalived/keepalived.conf
Adjust the following settings for each server, copy them into each keepalived.conf file and save.
# Global Settings
global_defs {
	enable_script_security
	script_user keepalived_script keepalived_script
}

# Check if HAProxy is running
vrrp_script chk_haproxy {
    script "/usr/bin/pgrep haproxy"
    interval 2
    weight 5
}

# Configuration for Virtual Interface
vrrp_instance LB_VIP {
    interface eth0
    state MASTER
    priority 101		    # Change to lower numbers on other servers
    virtual_router_id 51
    authentication {
        auth_type AH
        auth_pass p@ssw0rd  # Password used to communicate with other keepalived instances
    }
    virtual_ipaddress {
        192.168.50.50
    }
    track_script {
        chk_haproxy
    }
}
*UPDATE(4/22/23): Thanks to a helpful tip from elias in the comment section below, he noted that I had an error in the weight setting in the keepalived config. The weight setting actually adds to the priority setting when the service is up, but doesn't apply when its down. This means you need to make sure the weighted priority value of the next server in line is always higher than the base priority of the server "above" it.
On server01, you can leave all the settings the same as above except you'll need to confirm the interface name on your server. This can be checked by running ifconfig. You'll also want to pick a more secure password.
On server02 & server03 you'll also need to confirm the correct interface name, but you'll also need to change the priority to a number lower than 101. For example, on server02, you can change the priority to 99 and on server03 you can set it to 97.
The server with the highest priority will have the virtual IP address assigned to it which in our scenario will be server01. If that server goes down, the server with the next highest priority will takeover and so on.
*TIP: Similar to HAProxy, there are a lot of features and settings that can be setup within Keepalived such as email notification. If you'd like to explore more of them, checkout the Keepalived Docs.
Next change the permissions of each Keepalived config file.
sudo chmod 600 /etc/keepalived/keepalived.conf
Now we're going to create a non-root user on each server which Keepalived uses to check that HAProxy is running.
sudo useradd -U -M -s /sbin/nologin keepalived_script
With the configuration complete, start the Keepalived service on each server.
sudo systemctl start keepalived
Now we'll check to see that server01 has control of the virtual IP address. On server01, run the following.
ip --brief address
You should see the virtual IP listed next to server01's IP like so:
Virtual IP on Server01
eth0 UP 192.168.50.101/24 192.168.50.50/32
Testing
We'll need to create a remote MariaDB admin account that we can use to manage and test the cluster. Log into server01 and run the following.
sudo mysql -u root -e "GRANT ALL ON *.* to 'mdbadmin'@'%' IDENTIFIED BY 'password' WITH GRANT OPTION;flush privileges;"
Cluster Syncing Test
Now log into server02 and server03 and run the following to check if you see the account we just created on server01.
sudo mysql -u root -e "SELECT user,host FROM mysql.user WHERE user='mdbadmin';"
If your cluster is syncing changes correctly, you should see mdbadmin and % outputted for both servers.
Load Balancing Test
To test if MariaDB traffic is being load balanced, run the following command 3 times.
mysql -u mdbadmin -p -h 192.168.50.50 -e "SHOW VARIABLES LIKE 'server_id';"
You should see the server_id rotate between 1, 2 and 3. This means that HAProxy is successfully accepting incoming MariaDB connections on the virtual IP provided by Keepalived and load balancing them across all 3 servers in our Galera cluster.
Failover Test
Now we'll test out how environment performs when a server goes down. Start by powering off server01.
sudo poweroff
Check to see if the virtual IP has now transferred over to server02.
ip --brief address
You should see the virtual IP listed next to server02's IP like so:
Virtual IP on Server02
eth0 UP 192.168.50.102/24 192.168.50.50/32
Now create a test database.
mysql -u mdbadmin -p -h 192.168.50.50 -e "CREATE DATABASE testdb;"
Now power back on server01 and check to see that the test database has been created on it.
mysql -u mdbadmin -p -h 192.168.50.101 -e "SHOW DATABASES LIKE '%test%';"
If you see testdb listed, everything is working perfectly.
Wrapup
I started this article by talking about keeping websites up 24/7 on a budget and while databases are a key component of modern sites, you still need a webserver to present the data stored within these databases. I was tempted to include a section on adding NGINX to these servers, but this article has already run on longer than I planned. Instead, I'll try to write a followup to this article in the near future so these servers can truly function as a budget load balanced webserver environment.
I also encourage you to dig further into Galera, HAProxy & Keepalived as there are a lot of features I didn't have time to cover especially ones that focus on security if you plan on rolling this out into production.
In any case, I hope this article gets your gears turning and motivates you to look for more out of the box solutions. Stay safe everyone and thanks for reading!
 :
:
Hi!
Thanks for a nice instruction.
I’ve found an issue with the Keepalived settings:
# Check if HAProxy is running
vrrp_script chk_haproxy {
script “/usr/bin/pgrep haproxy”
interval 2
weight 2
}
The issue is when you set the “weight 2” the current value of the priority will be +2 on the first node.
But due to the next instructions this will not work:
On server02 & server03 you’ll also need to confirm the correct interface name, but you’ll also need to change the priority to a number lower than 101. For example, on server02, you can change the priority to 99 and on server03 you can set it to 97.
The point is that:
server 01 will go from 101 (down) to 103 (up)
server 02 will go from 99 (down) to 101 (up)
server 03 will go from 97 (down to 99 (up)
The correct usage of the “weight” should be the max(priority)-min(priority)+1 = 101-97+1 = 5
server 01 will go from 101 (down) to 106 (up)
server 02 will go from 99 (down) to 104 (up)
server 03 will go from 97 (down) to 102 (up)
The thing is if haproxy on server01 goes down the Keepalive is set back from 106 to 101 and the next highest prioriy server (server02) will get the virtual ipadress.
/E
Elias, thank you very much for pointing out my error. I went ahead and updated the guide and added a note to your comment.
Which version of Galera did you use, 3 or 4 ?
This guide was created with MariaDB 10.5.12 which comes with Galera 4 (26.4.9)
I have followed this tutorial to set up mysql cluster and load balancer, but unfortunately I am not able to start haproxy when we are binding to port 3306 ( like bind 192.168.50.50:3306) with mariadb running, but it works fine when I put off mariadb. Please me on this issue.
looking forward for your reply.
It sounds like you have mariadb bound to all IP’s instead of just its own IP address. If you followed the same IP structure as this guide, in /etc/mysql/mariadb.conf.d/50-server.cnf you should have bind-address set only to the IP address of each server, i.e. “bind-address = 192.168.50.101” for server01. In the haproxy.cfg, the virtual ip should be bound to port 3306, “bind 192.168.50.50 3306”.
You can confirm this with haproxy turned off and only mariadb running, if you run “netstat -an | grep 3306”. You should only see 192.168.50.101:3306 in the first column of IP’s. If you see 192.168.50.50:3306 or 0.0.0.0:3306, that means you have mariadb bound to the virtual IP address or all IP addresses which would conflict with haproxy.
If you double-checked and confirmed that you have mariadb and haproxy correctly configured, you should check /var/log/haproxy.log to see what errors show up.